Well after thinking about it for a while, I’m also joining the blogosphere and my opening post will be about using custom MSBuild target files to easily use the same codebase for compiling add-ins for multiple Revit versions.
Usually, when we make Revit Addins we have to support multiple Revit versions. Now we could copy the whole project and change the referenced DLL and .net Framework, but that would be a major violation of the DRY (Don’t Repeat Yourself) principle. Normally the code base for plugins for different Revit is almost identical with only small differences. You could change the DLL and .net framework manually, but this isn’t very robust, error-prone and well I’m lazy.
I have been experimenting with editing a csproj file so it dynamically loads the Revit Dll’s and sets the .net Framework for a couple of years now, but I never got it really stable. Enter .net core and its new csproj format. The new csproj format brings a couple of advantages that enables a stable workflow for supporting multiple Revit version from a single code base.
- NuGet packages are no longer referenced in a package.config file but can now be referenced inside the csproj file, which means the csproj file has total control over nuget packages. See https://blog.nuget.org/20170316/NuGet-now-fully-integrated-into-MSBuild.html
- MSBuild and Visual Studio now supports multi-targeting different .net Frameworks from the same code base. https://oren.codes/2017/01/04/multi-targeting-the-world-a-single-project-to-rule-them-all/
- Visual Studio now supports editing csproj files from inside Visual Studio.
- The csproj format has lost some of its weight and is now much smaller which also means it is also easier to read for humans. Just compare these 2 new projects in the old and new format.
Old Format
<?xml version="1.0" encoding="utf-8"?>
<Project ToolsVersion="15.0" xmlns="http://schemas.microsoft.com/developer/msbuild/2003">
	<Import Project="$(MSBuildExtensionsPath)\$(MSBuildToolsVersion)\Microsoft.Common.props" Condition="Exists('$(MSBuildExtensionsPath)\$(MSBuildToolsVersion)\Microsoft.Common.props')" />
	<PropertyGroup>
		<Configuration Condition=" '$(Configuration)' == '' ">Debug</Configuration>
		<Platform Condition=" '$(Platform)' == '' ">AnyCPU</Platform>
		<ProjectGuid>304c527a-416d-4aef-8f67-e41a5eff1b54</ProjectGuid>
		<OutputType>Library</OutputType>
		<AppDesignerFolder>Properties</AppDesignerFolder>
		<RootNamespace>ClassLibrary4</RootNamespace>
		<AssemblyName>ClassLibrary4</AssemblyName>
		<TargetFrameworkVersion>v4.6.1</TargetFrameworkVersion>
		<FileAlignment>512</FileAlignment>
	</PropertyGroup>
	<PropertyGroup Condition=" '$(Configuration)|$(Platform)' == 'Debug|AnyCPU' ">
		<DebugSymbols>true</DebugSymbols>
		<DebugType>full</DebugType>
		<Optimize>false</Optimize>
		<OutputPath>bin\Debug\</OutputPath>
		<DefineConstants>DEBUG;TRACE</DefineConstants>
		<ErrorReport>prompt</ErrorReport>
		<WarningLevel>4</WarningLevel>
	</PropertyGroup>
	<PropertyGroup Condition=" '$(Configuration)|$(Platform)' == 'Release|AnyCPU' ">
		<DebugType>pdbonly</DebugType>
		<Optimize>true</Optimize>
		<OutputPath>bin\Release\</OutputPath>
		<DefineConstants>TRACE</DefineConstants>
		<ErrorReport>prompt</ErrorReport>
		<WarningLevel>4</WarningLevel>
	</PropertyGroup>
	<ItemGroup>
		<Reference Include="System"/>

		<Reference Include="System.Core"/>
		<Reference Include="System.Xml.Linq"/>
		<Reference Include="System.Data.DataSetExtensions"/>


		<Reference Include="Microsoft.CSharp"/>

		<Reference Include="System.Data"/>

		<Reference Include="System.Net.Http"/>

		<Reference Include="System.Xml"/>
	</ItemGroup>
	<ItemGroup>
		<Compile Include="Class1.cs" />
		<Compile Include="Properties\AssemblyInfo.cs" />
	</ItemGroup>
	<Import Project="$(MSBuildToolsPath)\Microsoft.CSharp.targets" />
</Project>
New Format
<Project Sdk="Microsoft.NET.Sdk">

  <PropertyGroup>
    <TargetFramework>netcoreapp2.0</TargetFramework>
  </PropertyGroup>

</Project>
Using the targets
I have created NuGet packages and custom targets that you can use in your own projects. They are available at https://github.com/sanderobdeijn/RevitMSBuildTargets. You only have to download the files in the targets directory.
For my testing I used Visual Studio 2017, .net core should also work in Visual Studio 2015, but I haven’t tested this.
To use these you have to start your project with a .net core project template. You can do this in 2 ways.
Creating a new project with the dotnet cli
Open the command prompt or PowerShell
If you don’t already have a solution file navigate to the folder where you want to create the solution and enter the following command.
dotnet new sln [name]
For creating a new class project create a folder with the name of the project, navigate to this folder and enter the following commands.
dotnet new classlib
dotnet sln [slnpath] add [csprojpath]
Creating a new project with the Visual Studio UI
It is also possible to create a .net core project through the UI. When creating a new project go to the .net core folder and select the template named Class Libary (.NET Core).
Warning if you use this method Visual Studio references the csproj as the old format.
To fix this edit the .sln file in your favorite text editor, and look for a line that looks like this.
Project("{FAE04EC0-301F-11D3-BF4B-00C04F79EFBC}") = "ClassLibrary3", "ClassLibrary3\ClassLibrary3.csproj", "{9D4CAE96-28E2-428F-9DFE-8DD9596D0A5C}"
You have to replace the guid FAE04EC0-301F-11D3-BF4B-00C04F79EFBC with 9A19103F-16F7-4668-BE54-9A1E7A4F7556.
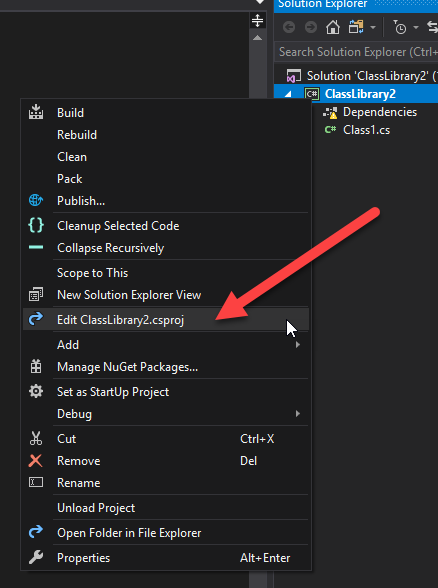
If you have done it correctly you can open the solution in Visual Studio and when you right-click the project in the Solution Browser an option “edit [projectname].csproj” should appear in the context menu.
When you edit the csproj file you can change it to this. You can add only 1 target or multiple targets.
<Project Sdk="Microsoft.NET.Sdk">
  <PropertyGroup>
    <RevitVersion>2017</RevitVersion>
  </PropertyGroup>
  <Import Project="[Path to your downloaded files]\Revit.RevitAPI.targets" />
  <Import Project="[Path to your downloaded files]\Revit.RevitAPIUI.targets" />
  <Import Project="[Path to your downloaded files]\Revit.AdWindows.targets" />
</Project>
If you save the file and look at your references you will see that the Dll’s are automatically referenced and changed if you change the Revit version.

Now for one last issue handling different endpoint in different versions of the same Dll. The RevitVersion parameter also controls conditional compilation flags in the csproj which means you can write code like this.
#if R2016

  // execute code in Revit 2016

#elif R2017 || R2018

  // execute code in Revit 2017 and 2018

#endif
Warning the new csproj format has some issues with wpf and window forms files and classes showing and editing correctly in Visual Studio
This will probably be fixed in .net Core 3 https://blogs.msdn.microsoft.com/dotnet/2018/05/07/net-core-3-and-support-for-windows-desktop-applications/
A future post will be about how to fix this in the meantime.
Next post will be about how this works behind the scenes.